How to Add an AI Assistant to Your Docs (in Under 1 Hour)
Learn how to add an AI assistant to your documentation in under an hour using Kapa. This guide covers RAG basics, widget setup, and how to turn static docs into a 24/7 support tool.

by
Dejan Lukić

The way we’ve traditionally perceived product documentation reminds me of how we think of vitamins: useful, but easy to forget about. Instead, it should be treated as a painkiller, relieving confusion for the user the moment it arises.
Before AI came along, documentation was static: web pages, API references, and PDFs that were changed infrequently. Now, it has become a living knowledge base that requires constant updates, accuracy checks, and context-aware answers. But, even the best-written docs have limitations. Users still search for answers across multiple sources and struggle to find the right answer quickly. And this isn’t just frustrating: it directly impacts conversion and possible retention.
This issue can be solved using an AI assistant, which can connect your documents, forums, repositories, and even chats to deliver instant, contextually accurate answers 24/7. Luckily, you don’t need to be an AI engineer to have AI in your workflow. In this guide, I will show you how to add an AI assistant to your documentation in under an hour, using Kapa as a ready-made solution.
What Is RAG?
As its name implies, the Retrieval-Augmented Generation (RAG) engine “augments” the capabilities of large language models (LLMs) by providing them with additional context.
Since LLMs are already trained on pre-existing data, they cannot know anything beyond unless you provide them with new information at query time. RAG uses vectorized data stored in vector databases from your documents, code bases, and other sources. It augments a user query by fetching a contextually relevant chunk of data and supplying it to the LLM as additional context.
Building your own RAG may sound simple. After all, there are plenty of SDKs and platforms that help you scaffold a RAG engine. However, the upkeep of such a system is far more complex. How do you keep information up-to-date? How do data pipelines ingest data into the system? Where will it be stored? How do you handle hallucinations, accuracy, and fine-tuning? What do you to protect the system from unsolicited inputs and abuse? The challenges add up quickly.
And the list isn’t even exhaustive. Managing models, GPUs, and data ingestion while trying to keep up with the advancements in AI can easily become a full-time job. And by the time everything is set up, parts of the system may already be obsolete.
Luckily, you can just leave it to Kapa.
Kapa is a RAG platform that connects multiple data sources and gives users instant answers with auto-updates, superb context-awareness, and accuracy. It does not replace your documentation platform, it just augments the documentation by adding an AI assistant on top of it.
Where Can AI Assistants Be Used?
User-facing platforms are the best place to snuggle an AI assistant. And by snuggling, I really mean that. You do not want your AI assistant in someone's face begging to be used. It should be available exactly when it’s needed.
Here are some places where it fits naturally.
Customer-facing | In-house |
|---|---|
Documentation sites, support sites, marketing pages, product website | Internal knowledge chat for support/success/GTM teams |
Support forums | Support copilot |
In-product, context-aware agent with user data | Sales enablement that helps answer technical questions during sales calls |
Customer-facing MCP, which lets customers query your docs directly from their IDE | Internal MCP server that gives your team AI-powered access to all internal knowledge |
Community channels in Slack, Discord, or forums | Technical product co-pilot that can be pinged on Slack |
Customer wikis | Internal wikis |
Choosing the right data sources for your AI assistant is even more important than deciding where it will appear. I recommend using official API references, forums, resolved issues, and Slack/Discord discussions.
Avoid unmoderated sources, as they could introduce low-quality answers into your AI assistant.
Setting up Kapa
The key to working effectively with Kapa is providing it with the right data sources. Properly managed data ensures that your assistant has access to the most up-to-date and contextually relevant information.
To create sources in Kapa, you need to have source creation permissions. Owners can create and manage sources for all projects, while members with "Edit project sources" permissions can create and manage sources only for specific projects that they have access to. Members without source permissions can view sources but cannot create or modify them, and users cannot access the Kapa platform directly or manage sources at all.
Kapa uses both role-based access control (RBAC) and fine-grained permissions. You can learn more in Roles and Permissions in Kapa.
To create a source, head to the Kapa Dashboard. Select Sources in the left-hand pane.
See the list of all available data sources.
Adding a Kapa Website Widget
Adding a Kapa Website Widget is the easiest yet most powerful way to integrate an AI assistant into your website. The widget allows users to ask questions about your product, delivering instant, accurate answers and dramatically improving the UX.
To set up the Kapa Website Widget, follow these steps:
Head to the Dashboard.
Under the Integrations tab, create a new website widget.
Enable your domain and set it live.
Kapa supports both production and any staging domains. You can use a regex pattern for dynamic subdomains. For testing purposes, http://localhost is enabled by default.
After enabling your domain, click "Copy integration ID" to get your unique
Website ID.To add the Kapa Website Widget, you need to add a script to the
<head>section of your website.
After adding the code snippet to the
<head>tag, make sure to replace theYOUR_WEBSITE_IDwithWebsite IDyou’ve copied from the dashboard. Update the remaining placeholder values. See the full list of configuration options.
YOUR_WEBSITE_ID: The Website ID copied in the step 4 (for example,XXX-XXX-XXX).YOUR_PROJECT_NAME: Shown project name (for example,kapa.ai).YOUR_HEX_COLOR_CODE: Your brand's color in hexadecimal format (for example,#000000).https://YOUR_LOGO_URL.com/logo.png: A direct URL to your logo.
If your website has a Content Security Policy enabled, you'll need to whitelist the necessary domains in your CSP configuration to allow the widget to function properly. See How Do I Fix CSP Errors?
Neat! You’ve added the Kapa Website Widget! Now head to your website (make sure you’ve saved and updated the changes, and allow some time for propagation). You should see the Kapa Website Widget appear in the corner. Test it by asking specific questions to confirm it’s working as intended.
These instructions should work for majority of platforms, though some may require additional steps or specific configuration. Kapa provides complete installation guides for platforms like:
Confluence for Atlassian Confluence sites
Discourse for Discourse forums
Docusaurus for Docusaurus documentation sites
Framer for Framer websites
Freshdesk for Freshdesk support portals
GitBook for GitBook documentation
Mintlify for Mintlify documentation
MkDocs for MkDocs sites
Next.js for Next.js applications
Nextra for Nextra documentation
ReadMe for ReadMe documentation
Read the Docs for Read the Docs sites
Salesforce for Salesforce sites
Sphinx for Sphinx documentation
Webflow for Webflow websites
WordPress for WordPress sites
Zendesk for Zendesk help centers
If your platform is not listed, there’s no need to worry. The Kapa team is always happy to assist in integration. Feel free to reach out for help - support@kapa.ai.
The Kapa Website Widget comes with a fully-fledged suite of features designed to enhance the UX:
AI conversations: Users can have natural conversations with your documentation, getting instant and accurate answers about your product or service.
Search mode: Users can search through your documentation sources directly within the widget.
Answer feedback: Users can provide feedback on answers through an upvote/downvote system. This gives you insight into answer quality.
User satisfaction surveys: You can collect structured feedback from users through customizable satisfaction surveys that appear after conversations.
Deep thinking mode: For complex queries, users can enable deep thinking mode to let Kapa analyze a broader portion of your knowledge base, which will result in more comprehensive and detailed answers.
Example questions: This feature displays suggested questions, helping users understand what they can ask to get started.
Source citations: Every answer includes clickable source links, which will allow users to dive deeper into the original documentation.
UI localization: Kapa offers support for multiple interface languages, making the widget accessible internationally. See the list of supported languages.
Once you have set up the Kapa Website Widget and learned what it can do, you can explore advanced configuration with User Tracking or the JavaScript API to customize it further.
Working with Kapa
Now that you’ve set up the Kapa Website Widget, let's see what it has collected about your user queries.
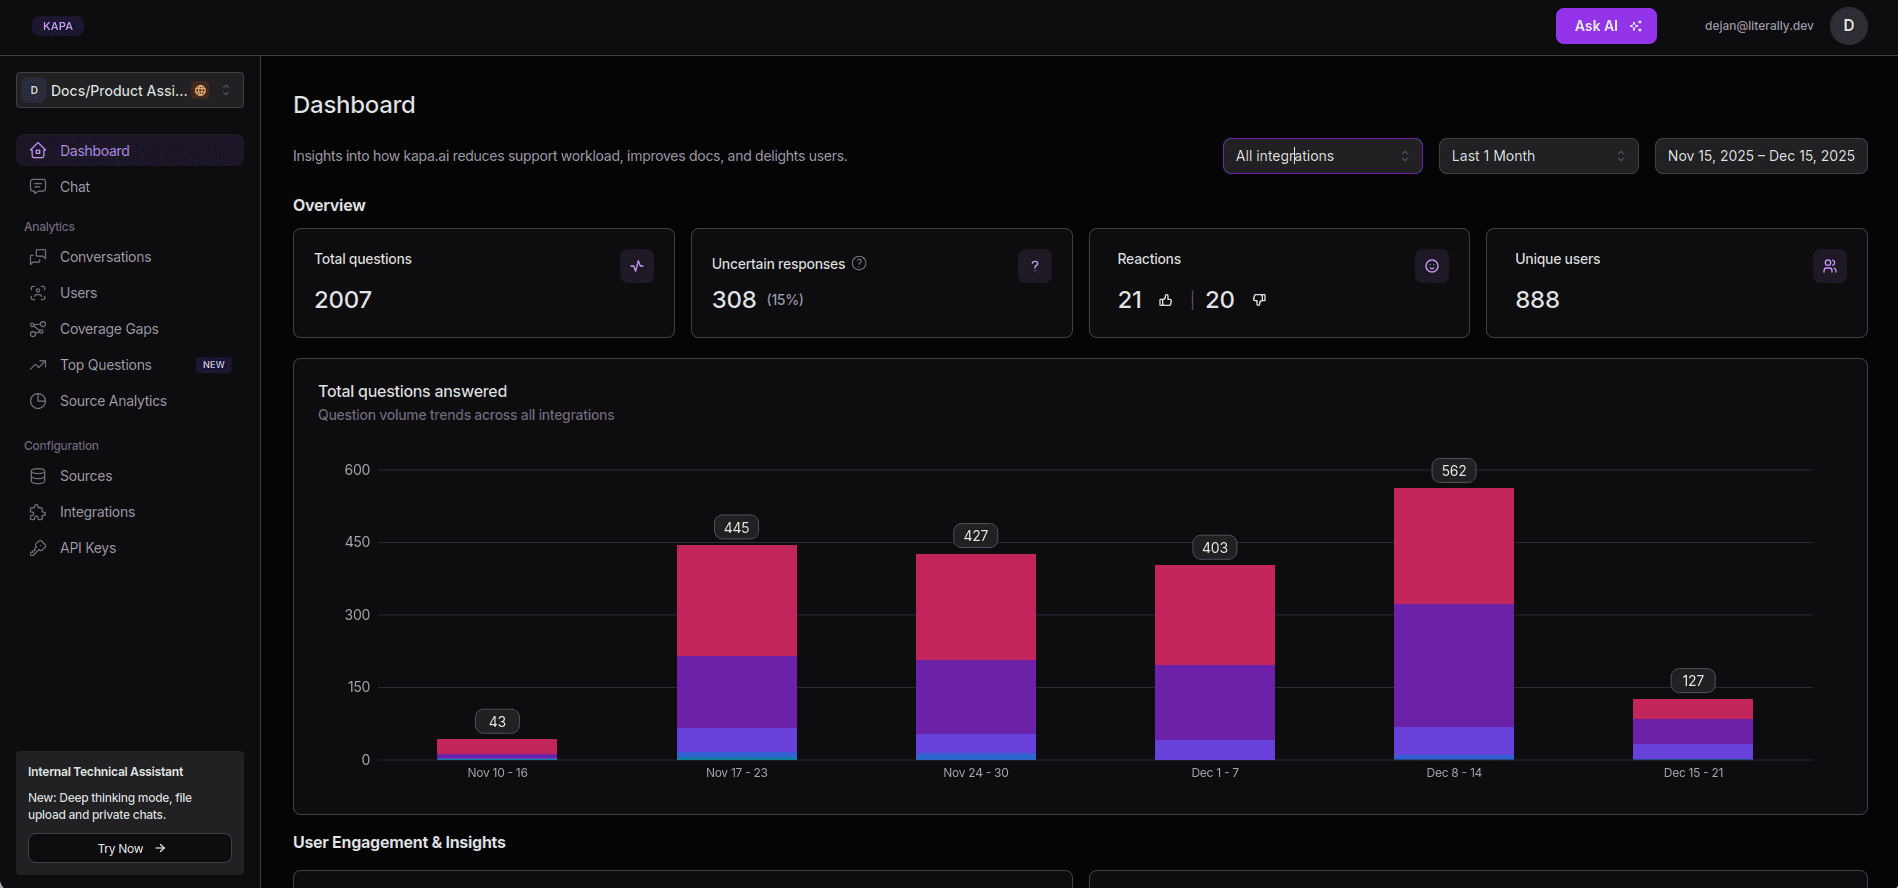
Kapa's dashboard is designed to give you insights into how it delivers answers, including accuracy, source quality, and content coverage gaps. Let's take a quick look at all these features:
Conversations
In the Conversations section of the dashboard, you can review user interactions with the assistant.
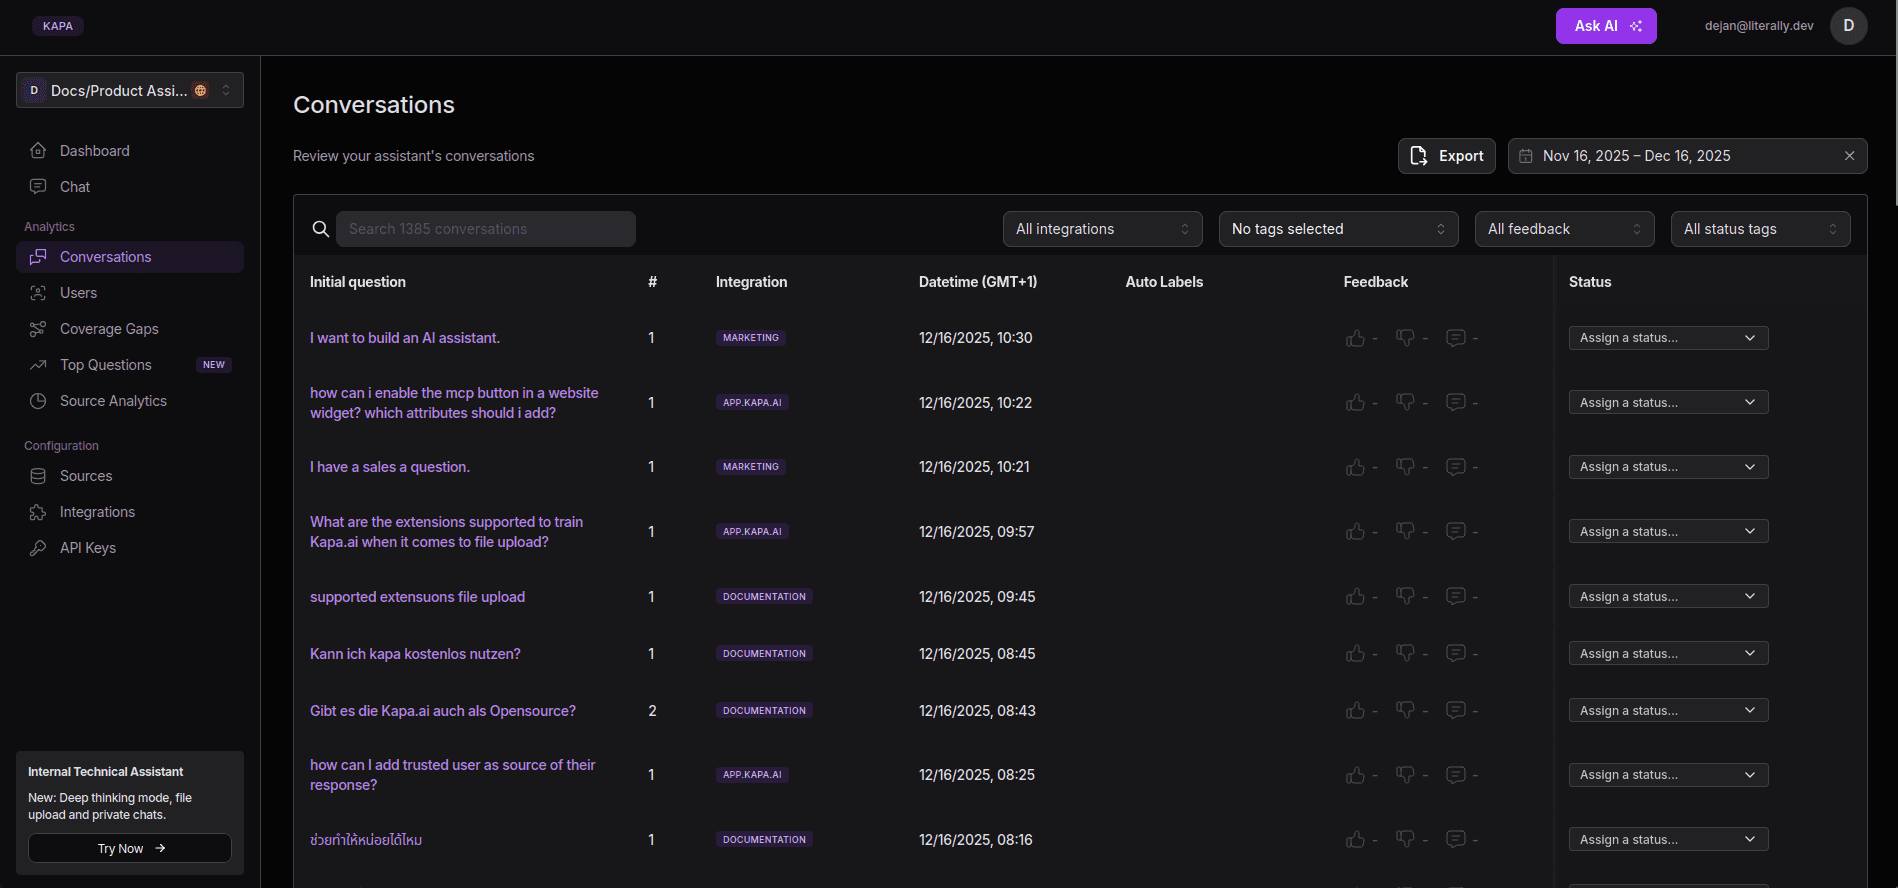
This section lets you see all the conversations a user has had with the assistant. You can filter them by the integration conversation happened in, tags, time period, feedback with upvotes and downvotes, and status.
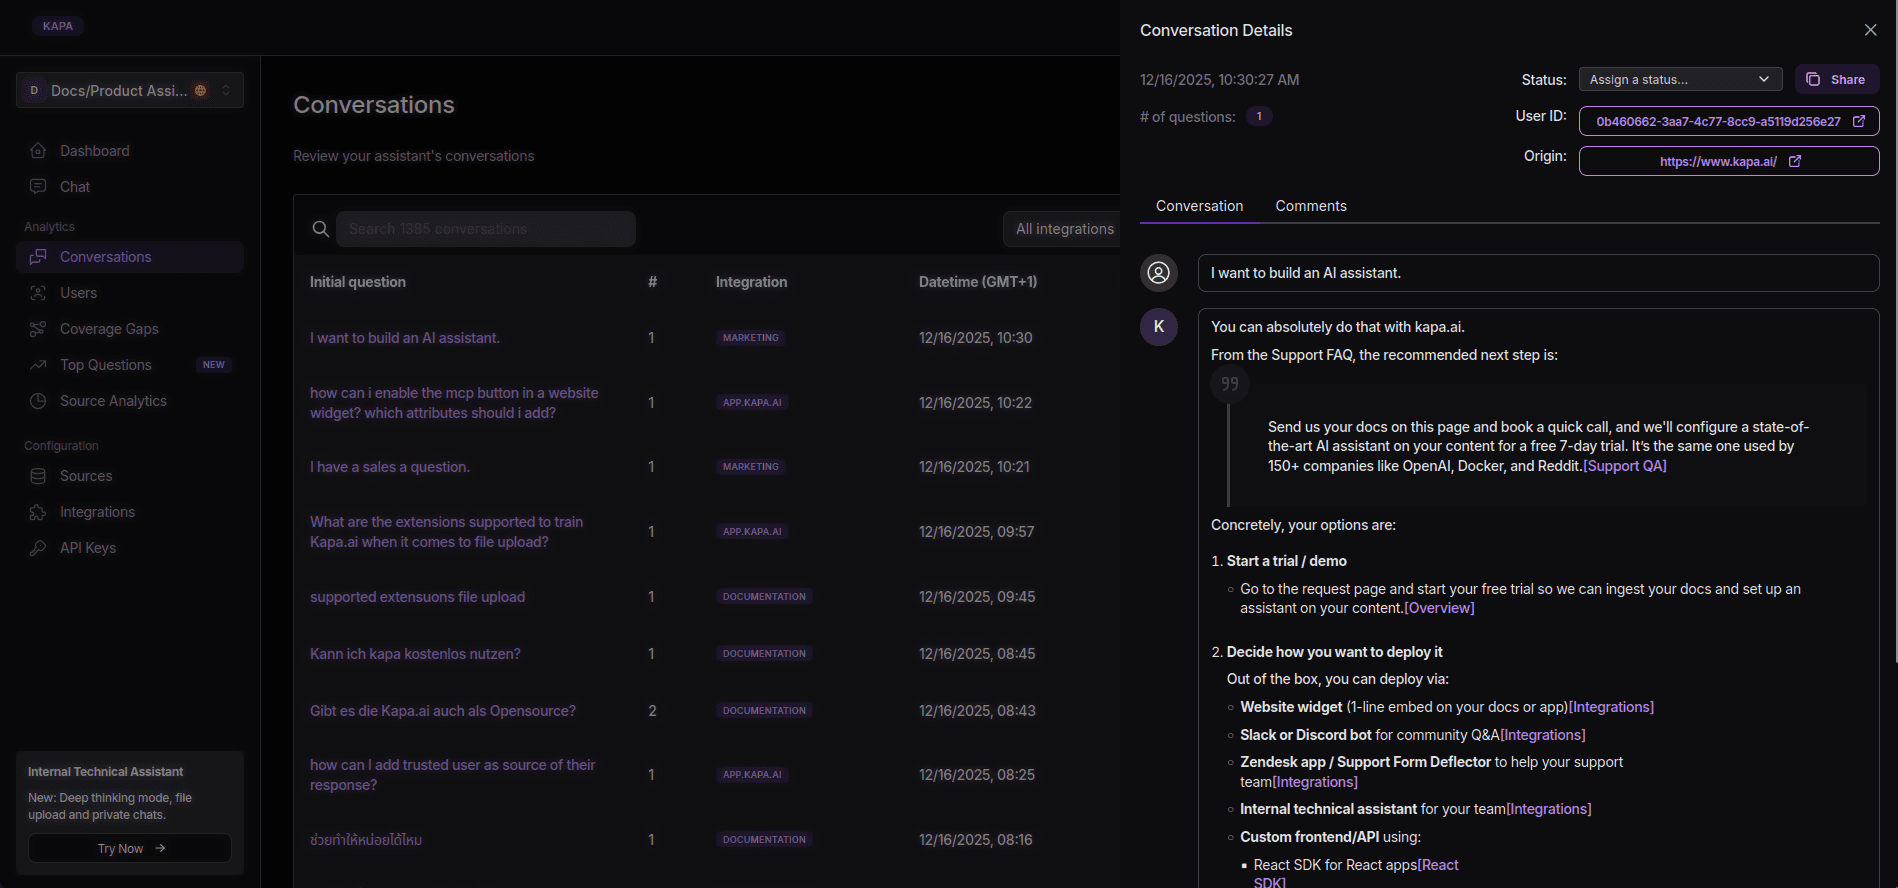
When you click on a specific conversation, which is named after its initial question, you can see the whole transcript, sources that Kapa chose when answering, where the conversation originated, and which user talked to the assistant.
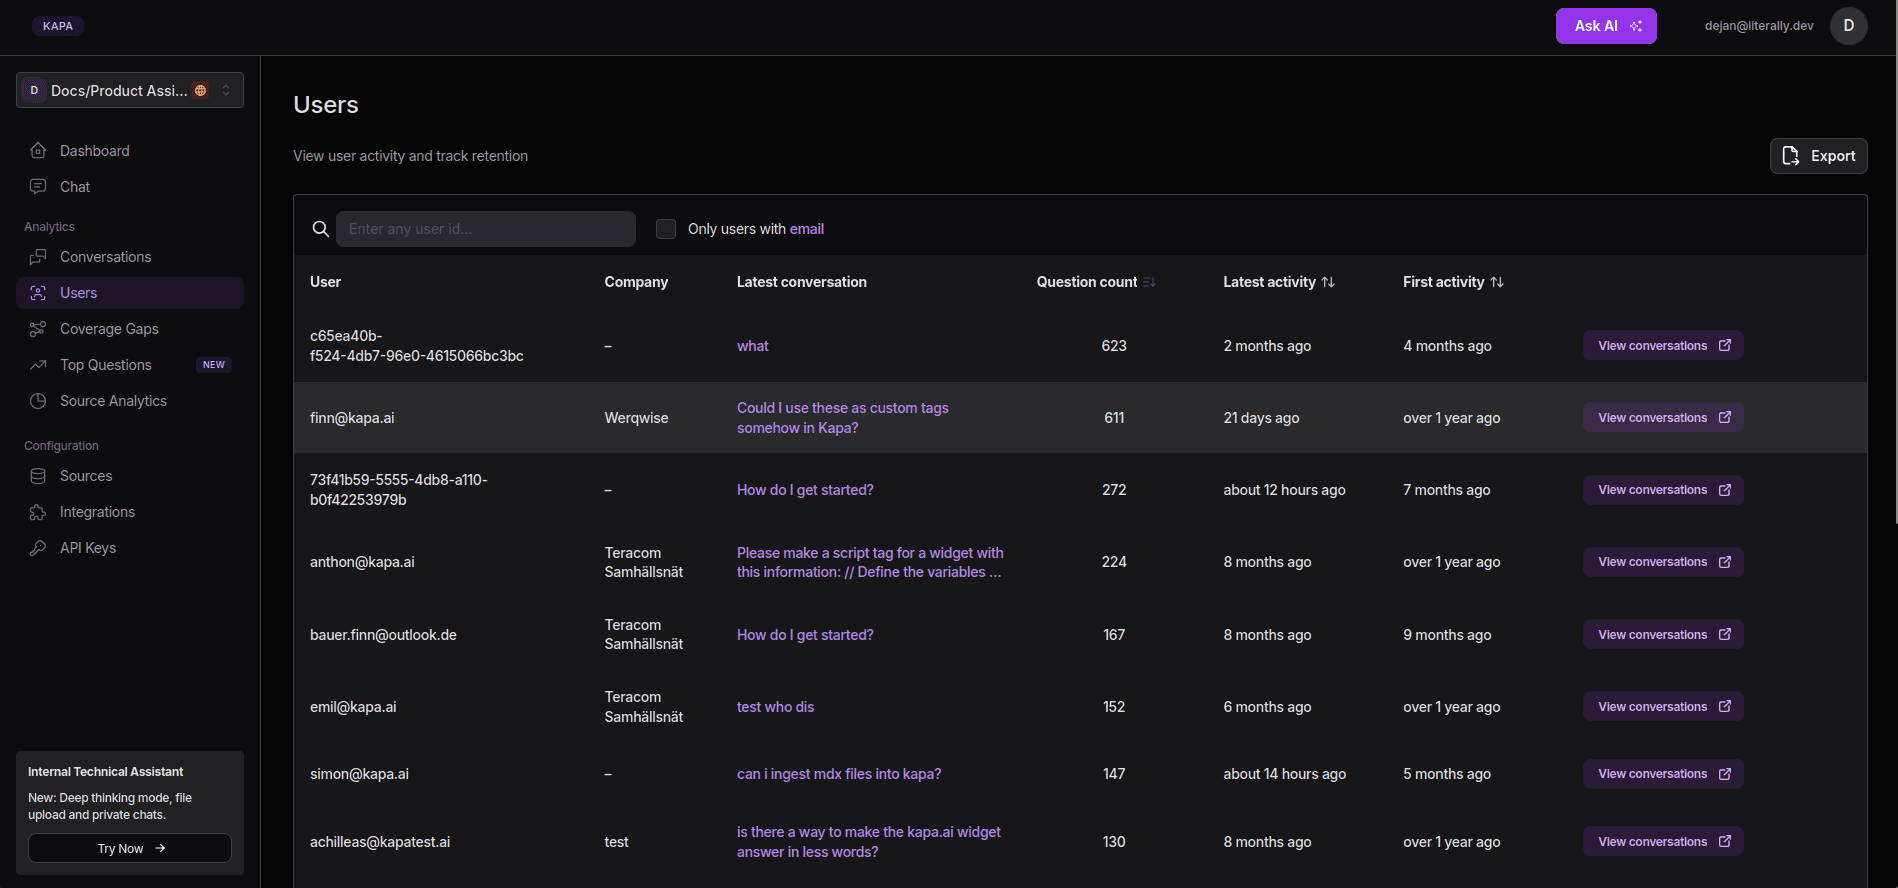
Users
You can view individual users who communicated with the assistant, along with their conversations, question count, and timestamps for their first and latest activity.
Coverage Gaps
Coverage Gaps, one of the key features in Kapa, helps you identify areas where the assistant was unable to provide a conclusive answer.

Kapa analyzes the uncertain answers over a selected time-frame (for example, a week, month, or a quarter) where it did not provide a satisfactory answer. It groups recurring topics that resulted in uncertain responses into clusters and creates a two-part summary:
Finding: A breakdown of what users asked and why Kapa failed to provide a complete answer;
Recommendation: AI-generated suggestions on how to address the identified gap by updating your documentation.
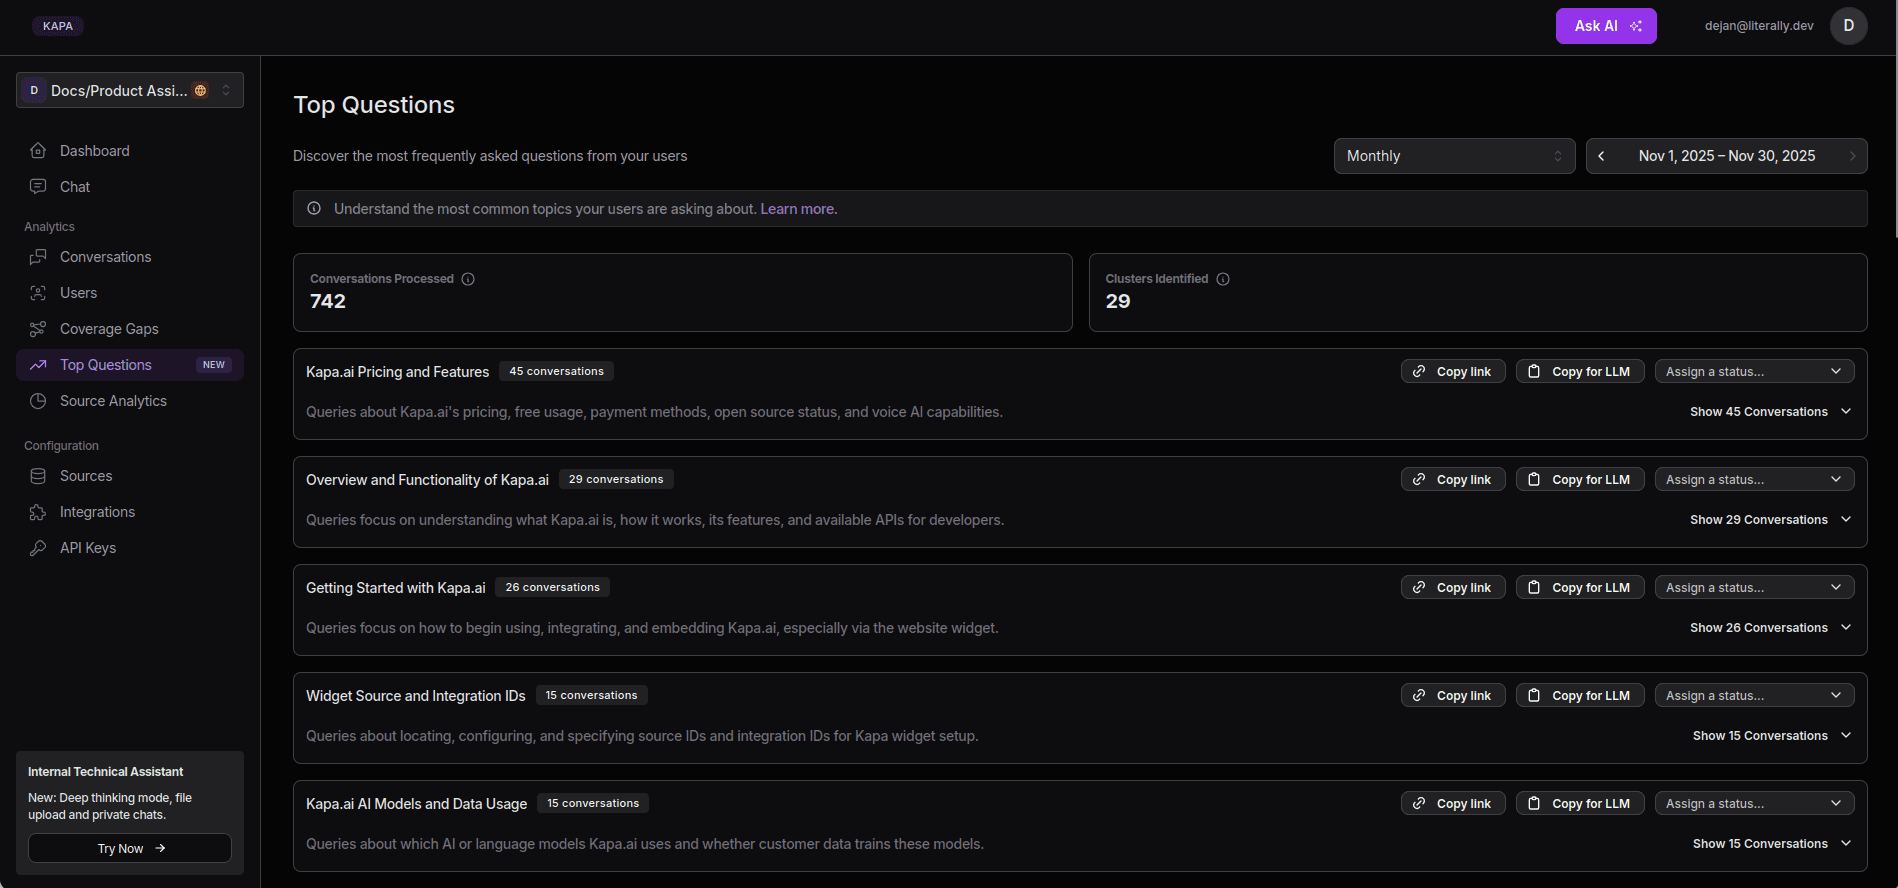
Top Questions
Kapa helps you discover the questions your users ask most frequently. The Top Questions section displays the total number of processed conversations and organizes recurring questions into clusters, which can be sorted by:
Weekly, monthly, or yearly volume
Time period
Source Analytics
In the Source Analytics tab, you can see which sources Kapa references most frequently. It shows how many times a source has been used and the total percentage of all answers it contributed to during a selected time period.
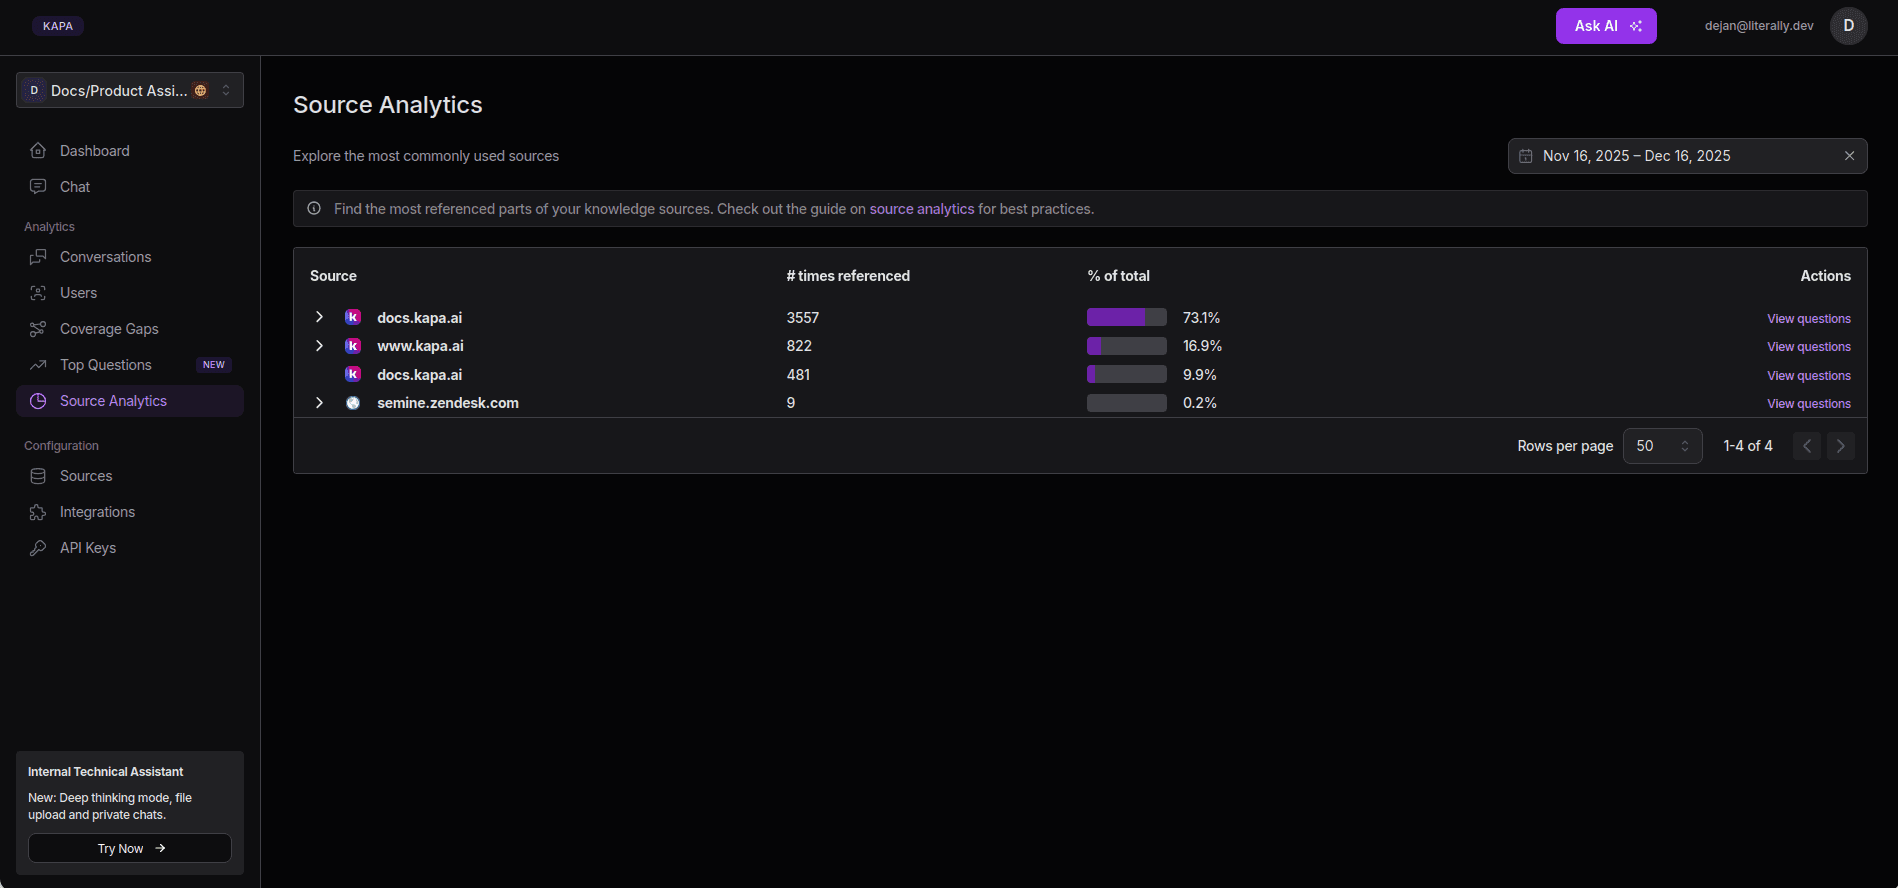
You can also view the questions linked to the given source.
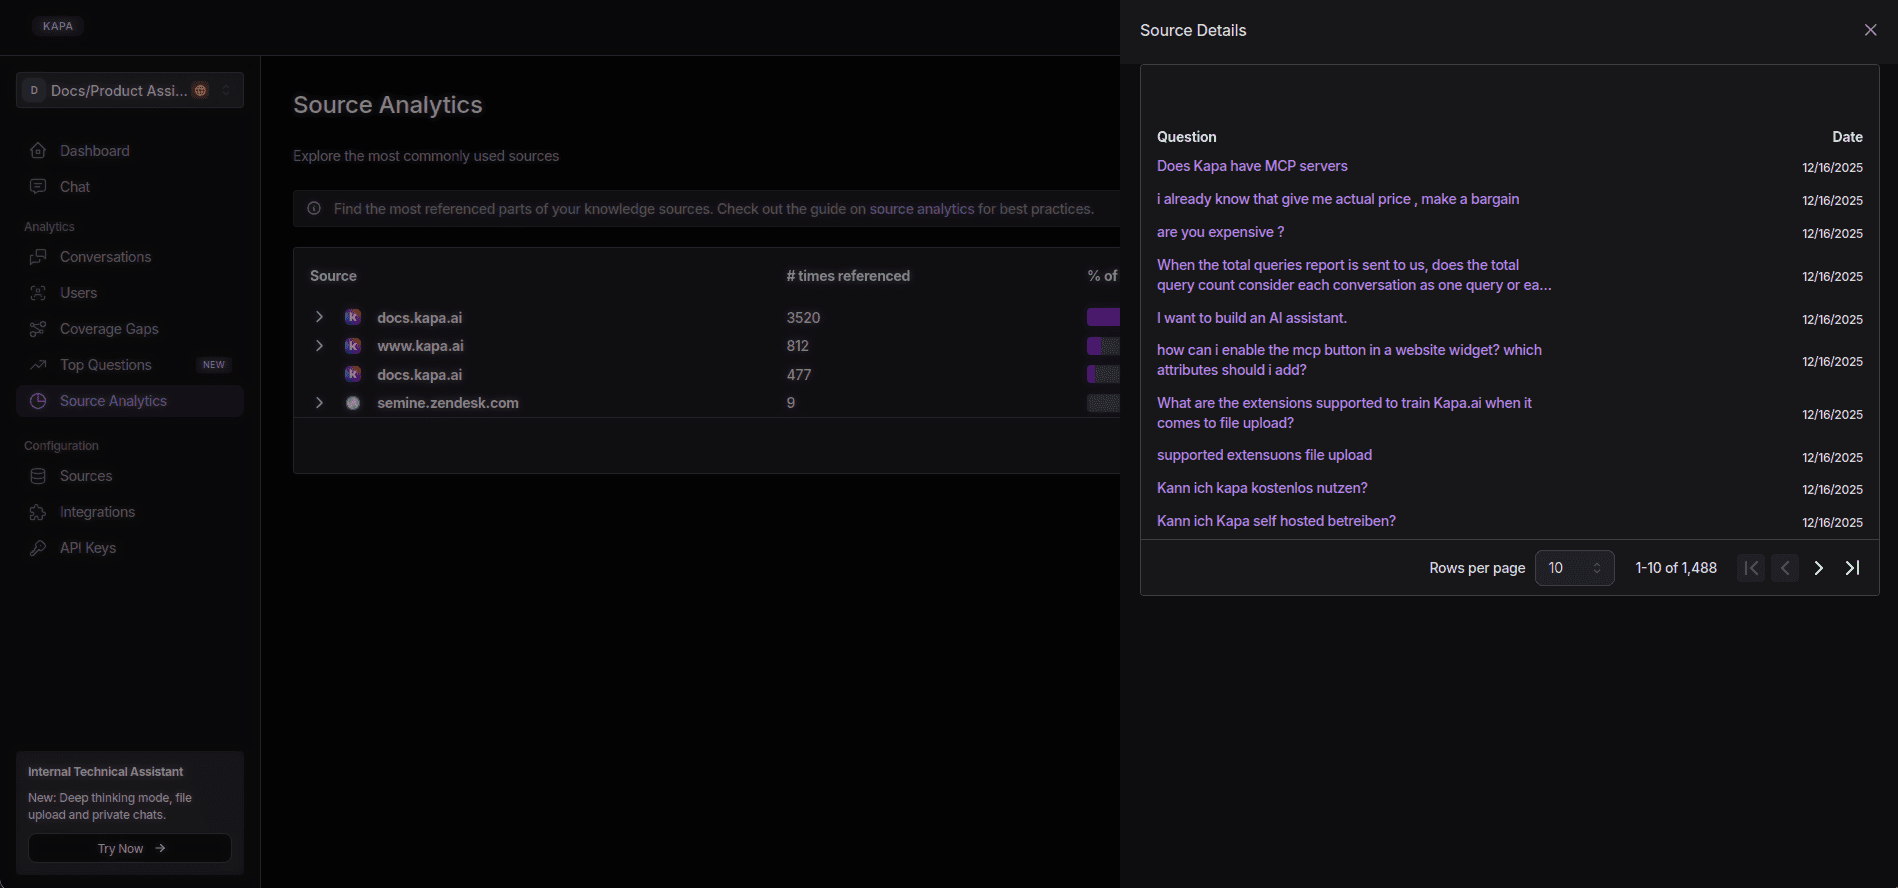
Every answer Kapa provides is backed by specific sections of your knowledge sources.
Real-World Examples
Kapa is already powering user-heavy products, giving you battle-tested data and testimonials that clearly show why relying on Kapa is better than building a DIY RAG system.
Kapa delivers AI assistance for over 200 leading tech companies all over the globe.
See how companies like Netlify, Monday.com, Mapbox, CircleCI, and Coralogix leverage Kapa to transform their developer experience. Read Customer Stories to learn more.
Next Steps and Conclusion
Kudos! By now, you’ve ingested content that Kapa can understand and added a widget to your website, giving your users a way to talk to your documentation. Implementing AI into your documentation platform works best when done one step at a time, starting small, and testing along the way.
Kapa's onboarding team can help you do just that. Book a demo to add intelligence to your knowledge base.
FAQs
What is RAG and how does it work?
RAG (Retrieval-Augmented Generation) lets you build a bot that uses your own data. You store relevant information such as documentation in a vector database, and when someone asks a question, the bot pulls the most relevant pieces from that data and uses them to generate a response.
Why shouldn't companies build their own RAG system?
Building production-grade RAG requires managing data pipelines, accuracy tuning, infrastructure, and security. This can quicly turn into a full-time job. The shifts on the AI market happen rapidly, making custom solutions obsolete within months. Managed platforms like Kapa handle this complexity instead.
Where should AI assistants be placed for maximum impact?
Place AI assistants where it makes the most sense for customers. For example, documentation sites, in-product help, community channels, and IDE extensions for developers. Internally, use them as support copilots, or for sales enablement and technical onboarding.
What data sources should you prioritize for accuracy?
To ensure you get accurate responses, you need to stick to sources you can trust, like official documentation, resolved support tickets and relevant chat threads. It’s best to not train Kapa on random Discord threads or unfinished docs, as this introduces inaccuracies.
How quickly can you implement Kapa?
Kapa can be deployed in under an hour. The process is simple. You create an account, log in, and then connect data sources from 50+ available connectors. Kapa automatically crawls and vectorizes your content, which means you don't need direct dev support.


