Launch a Docs MCP Server for Your Users in One Click
Your developers shouldn't have to leave their IDE to search your docs. Now they don't have to.

by
Emil Sorensen

We just shipped something developers have been asking for: hosted MCP servers. With a single click, you can deploy an MCP endpoint that connects your Kapa knowledge base directly to tools like Cursor, Claude Code, VS Code, Windsurf, and ChatGPT.
No infrastructure to manage. No code to write. Just instant, AI-powered access to your docs - right where your users work.
Why This Matters
When a developer is deep in their codebase, context-switching kills flow. They hit a question about your API, rate limits, or SDK - and suddenly they're tab-hopping through docs, Slack, and Stack Overflow.
With your Kapa MCP, they just ask their AI coding assistant. Behind the scenes, it queries your knowledge base and returns grounded, cited answers. No context switch. No guesswork.
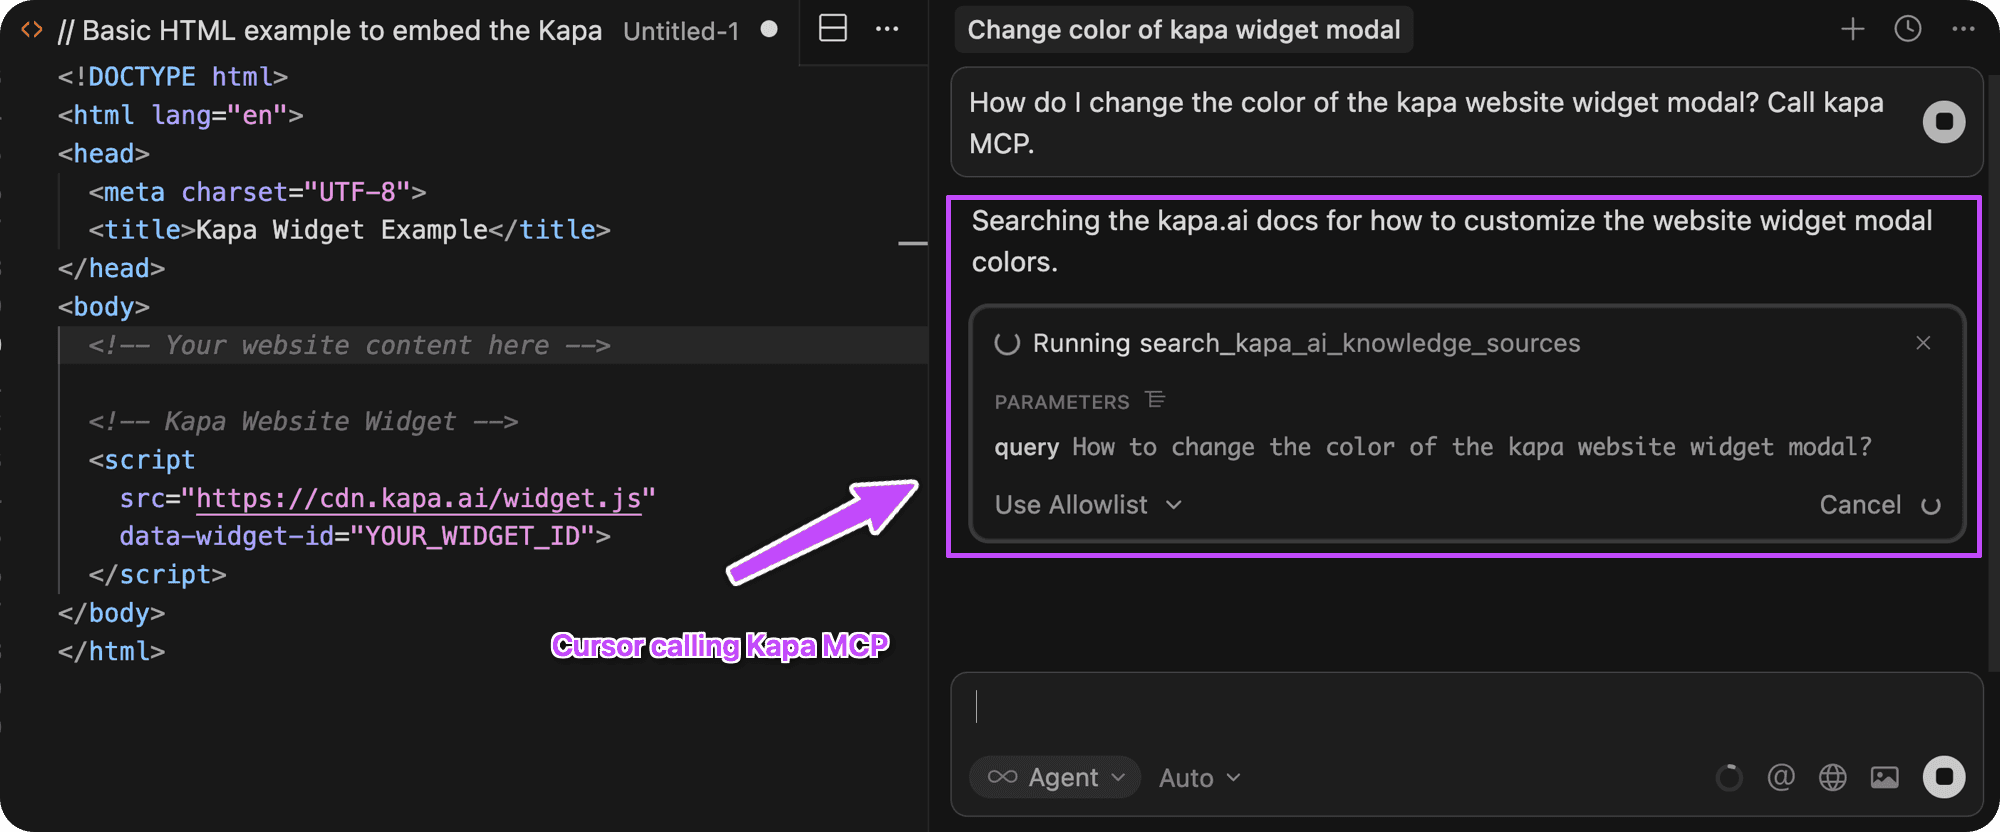
Example: Cursor querying Kapa's own MCP to answer a question about a kapa widget configuration.
Setup Takes 60 Seconds
This guide assumes you already have a Kapa account with your knowledge sources connected -docs, API references, forum threads, help center articles, GitHub discussions, or wherever your technical content lives. If you're still setting that up, start with our knowledge sources guide.
Once your knowledge base is ready, here's how to launch your MCP server:
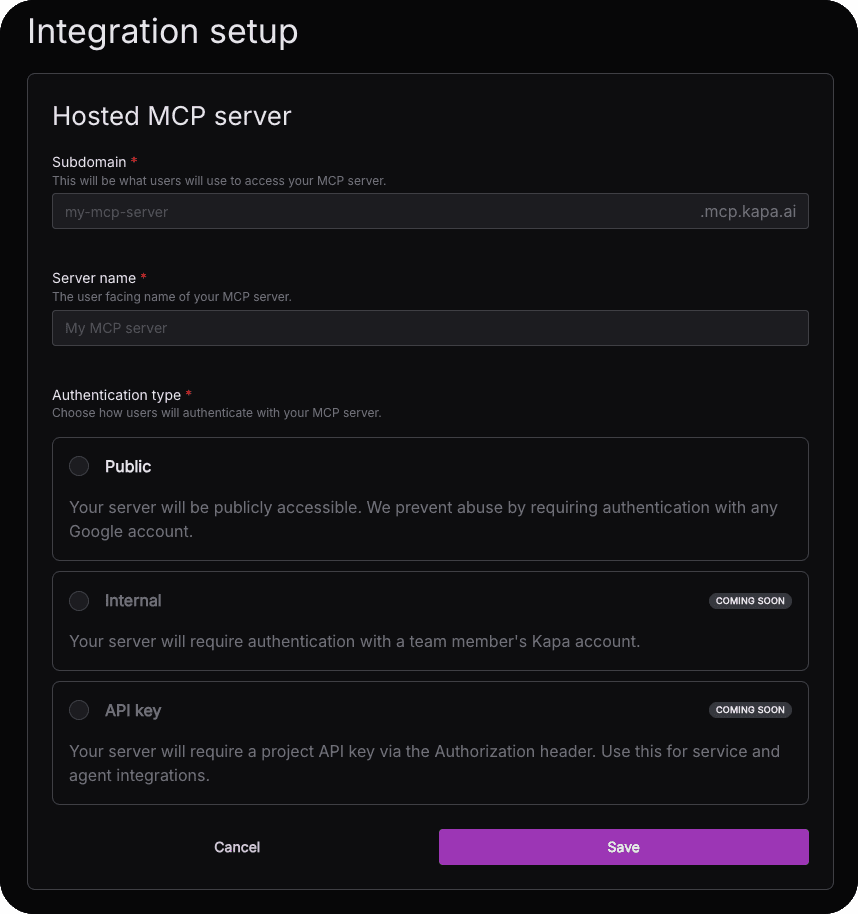
Create the integration In your Kapa dashboard, navigate to Integrations → + Add new integration and select Hosted MCP Server.
Configure your subdomain Choose a subdomain for your MCP endpoint. This becomes your public URL:
<subdomain>.mcp.kapa.aiSet your server name Pick a display name that users will see when connecting (e.g., "Acme Docs" or "YourProduct API").
Click Continue That's it. Your MCP server is live.
Your endpoint is now ready for users to connect from Cursor, Claude, and other MCP-enabled tools.
Add the Install Menu to Your Widget
Want to make it dead simple for users to discover and connect? Add the MCP install button to your existing Kapa widget with two lines (see docs):
That's it. Users will now see an MCP install option in the widget header dropdown, with copy-paste instructions for their preferred tool.
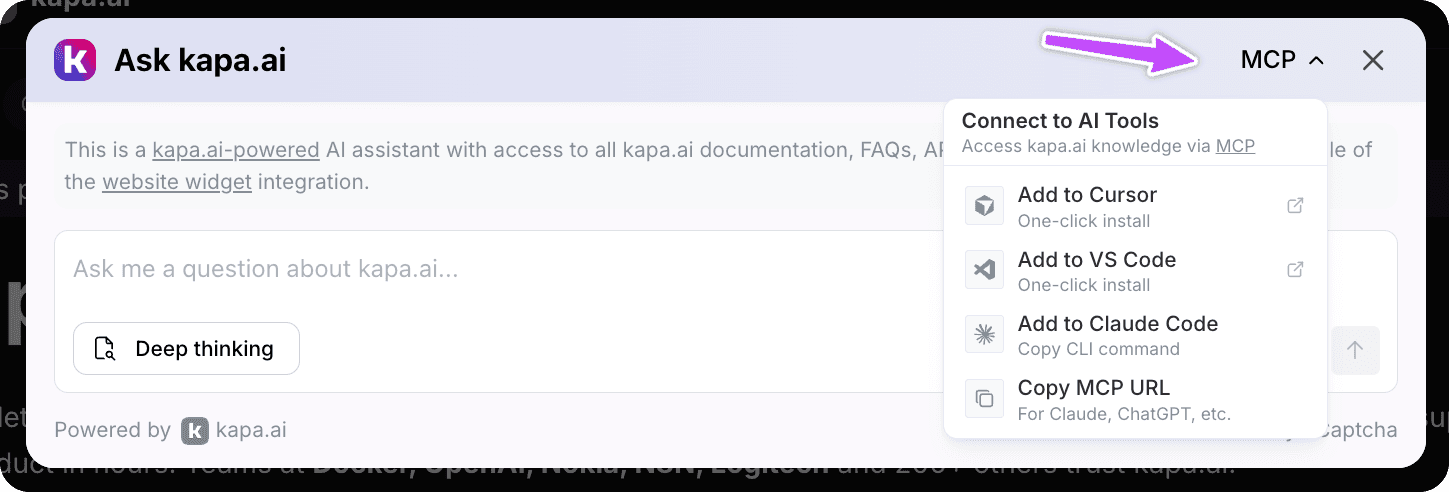
Example: Chat widget showing the header dropdown menu for MCP connections when enabled
What Your Users Experience
Once connected, your MCP works seamlessly with the AI tools developers already use:
In Cursor
You saw it at the top of this post - developers can query your docs mid-coding session. Questions like "What's the rate limit for the /search endpoint?" or "How do I configure OAuth?" get instant, accurate answers without leaving the editor. The AI assistant calls your MCP, retrieves grounded information from your knowledge base, and responds with cited sources.
In Claude Desktop & Claude Code
Users can add your MCP as a custom integration directly from Claude Desktop settings, or configure it manually via the config file. Claude Code users can run claude mcp add from the terminal. Either way, Claude gets grounded context about your product for every conversation.
Other Tools
Kapa's hosted MCP works with VS Code, Windsurf, ChatGPT Desktop, and any other MCP-compatible tool. See our MCP installation guide for setup instructions across all supported platforms.
Built-in Security & Rate Limiting
When users connect for the first time, Kapa handles authentication via Google sign-in (OpenID Connect). We only request the minimal openid scope—no access to email, name, or personal data.
This anonymous ID enforces per-user rate limits to prevent abuse:
40 requests per user per hour
200 requests per user per day
You get protection without complexity.
Track Usage in Your Dashboard
Like all Kapa integrations, your MCP server usage shows up in analytics. See what questions developers are asking via MCP, identify documentation gaps, and understand how your docs are being consumed in AI workflows.
Get Started Today
If you're already a Kapa customer, the hosted MCP is ready for you right now. Head to your dashboard and set it up in under a minute.
Not using Kapa yet? Let's chat about how we can power your documentation AI.
Spread the Word
Once your MCP is live, share it with your developer community. Add it to your docs, mention it in your changelog, post it on social. Your users will thank you for meeting them where they already work.
Resources
Happy building! 🚀
Frequently Asked Questions
What is an MCP server?
MCP (Model Context Protocol) is an open standard created by Anthropic that lets AI assistants connect to external tools and data sources. An MCP server exposes your data-like documentation-so AI coding tools can query it directly. Think of it as a universal API for AI assistants, similar to how REST APIs standardized how applications talk to each other.
What does MCP stand for?
MCP stands for Model Context Protocol. It's an open protocol that standardizes how AI models connect to external data sources and tools. The "context" part refers to giving AI models additional context beyond their training data-like your product documentation, APIs, or internal knowledge bases.
Which AI tools support MCP?
MCP is supported by most major AI coding tools, including:
Cursor - Add MCP servers in Settings → MCP
Claude Desktop - Configure in Settings → Custom Integrations or via config file
Claude Code - Run
claude mcp addfrom the terminalVS Code (with Copilot) - Configure in settings.json
Windsurf - Add to mcp_config.json
ChatGPT Desktop - Via the Apps & Connectors settings
Kapa's hosted MCP works with all of these out of the box.
How do I add an MCP server to Cursor?
To add a Kapa MCP server to Cursor:
Open Cursor Settings (Cmd/Ctrl + ,)
Navigate to the MCP section
Click "Add MCP Server"
Enter your Kapa MCP URL:
https://your-subdomain.mcp.kapa.aiSave and restart Cursor
Your documentation is now available in Cursor's AI assistant.
How do I add an MCP server to Claude Desktop?
There are two ways to add a Kapa MCP to Claude Desktop:
Via Settings (easiest):
Open Claude Desktop → Settings → Custom Integrations
Add your MCP URL:
https://your-subdomain.mcp.kapa.aiAuthenticate with Google when prompted
Via config file: Add this to your Claude Desktop config:
Do my users need to install anything?
No installation required. Kapa's MCP is a remote hosted server-users just copy the connection URL and paste it into their AI tool's MCP settings. No npm packages, no local servers, no Docker containers.
How is a hosted MCP different from building my own MCP server?
Building your own MCP server requires setting up infrastructure (typically Cloudflare Workers), managing API keys, implementing OAuth authentication, handling rate limiting, and ongoing maintenance.
With Kapa's hosted MCP, you click a button. We handle deployment, authentication, rate limiting, and uptime. You get a working endpoint in 60 seconds instead of hours or days.
How do users authenticate with my MCP server?
When connecting for the first time, users sign in with Google (OpenID Connect). Kapa only requests the minimal openid scope-we don't see their email, name, or any personal data. This anonymous ID is used solely to enforce rate limits and prevent abuse.
What are the rate limits for MCP servers?
Each authenticated user gets:
40 requests per hour
200 requests per day
These limits prevent abuse while being generous enough for normal development workflows.
Can I create multiple MCP servers?
Yes. You might create separate MCP servers for different documentation sets (e.g., public docs vs. internal docs), different products, or different teams. Each gets its own subdomain and analytics.
How is this different from the Kapa API?
The Kapa API is designed for building custom integrations-you call it from your own code. The MCP server is designed for end-user consumption-your developers connect directly from their AI tools without writing any code. MCP also gives you automatic compatibility with every MCP-enabled tool.
Will this work with my private/internal documentation?
Yes, the Internal MCP allows you to connect to internal data sources: https://docs.kapa.ai/integrations/mcp/guides/tutorial-internal-auth-chat-connector
How do I track MCP usage separately from other integrations?
MCP queries appear in your Kapa analytics dashboard as a separate integration. You can filter by the MCP integration to see what questions developers are asking, identify documentation gaps, and monitor usage patterns specific to IDE-based queries.
What if a user asks something not covered in my docs?
Kapa returns grounded, cited answers from your knowledge sources. If the answer isn't in your docs, the response will indicate that clearly. This prevents hallucinations and ensures developers get accurate information-or know when they need to look elsewhere.
How do I tell my users about my MCP server?
Once your MCP is live:
Add the widget dropdown (two data attributes-see above)
Create a docs page with setup instructions for Cursor, Claude, and other tools
Announce it in your changelog, developer newsletter, or social media
You can use Kapa's own MCP docs page as a template.
What's the difference between MCP and function calling?
Function calling lets an AI model invoke predefined functions within a single application. MCP is a protocol that lets AI models connect to external servers and tools across applications. MCP enables a standard way for any AI tool to access any data source-including your documentation via Kapa.


